
Dinner, Break Fast, Snacks
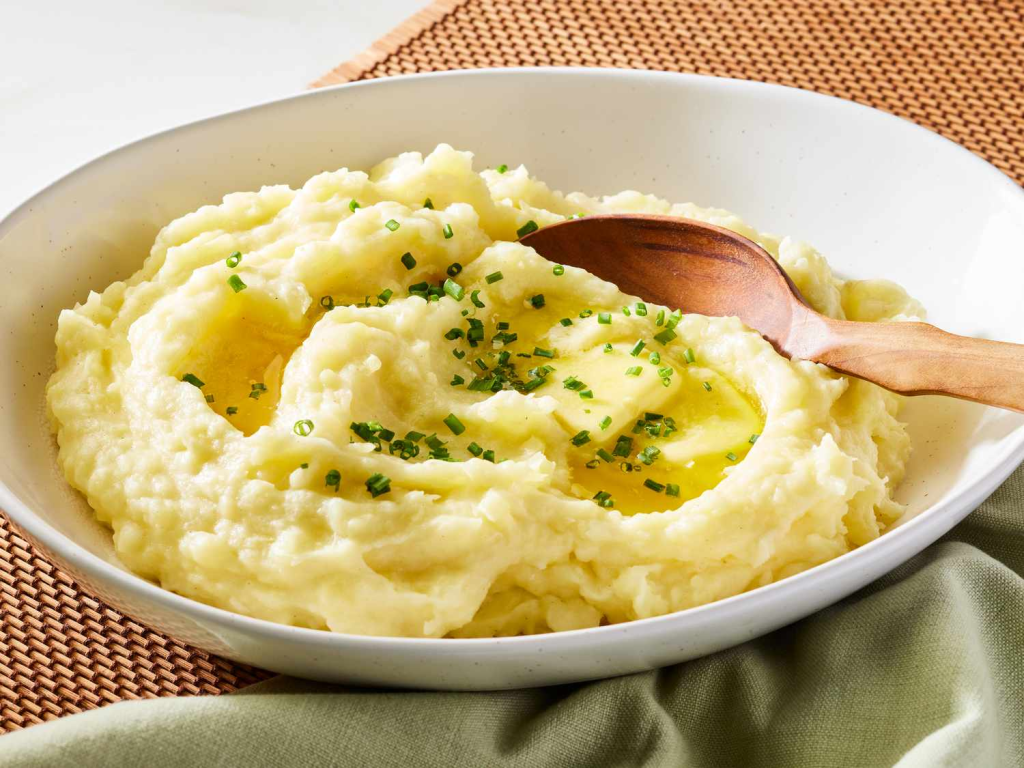
🥔 Creamy Garlic Mashed Potatoes Made Easy with Always Save
✅ Quick & Effortless – Ready in minutes—no peeling or mashing needed!
✅ Budget-Friendly Comfort Food – Creamy, filling, and affordable for family meals.
✅ Customizable – Add cheese, herbs, or gravy for endless variations.
✅ Perfect Side Dish – Complements any entrée beautifully.
Ingredients
1 pack Always Save Mashed Potatoes
1½ cups hot water
½ cup milk (optional for extra creaminess)
2 tbsp butter
1 clove garlic (minced or powdered)
Salt & pepper to taste
Optional garnish: Chopped parsley or shredded cheese
Olive oil spray or butter (optional, for extra crispiness)
Directions
Heat the water – Bring 1½ cups of water to a gentle boil.
Mix it up – Remove from heat, stir in butter and milk (if desired).
Add the magic – Stir in Always Save Mashed Potatoes flakes and mix until smooth.
Flavor boost – Add minced garlic, salt, and pepper. Stir well.
Serve & enjoy – Top with parsley or cheese and serve warm with grilled chicken, steak, or veggies.
Dinner, Break Fast, Snacks
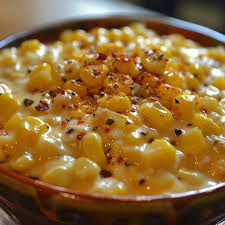
Creamy Corn Delight with Pictsweet Golden Sweet Cream Corn
✅ Naturally Sweet & Fresh – Made from tender golden corn for that homemade taste.
✅ Ready in Minutes – A quick side dish for busy days.
✅ Versatile Use – Perfect for soups, casseroles, dips, or as a creamy topping.
✅ Budget-Friendly Goodness – Delicious comfort food that’s easy on your wallet.
Ingredients
1 can Pictsweet Golden Sweet Cream Corn
1 tbsp butter
¼ cup milk or cream
½ tsp salt
¼ tsp black pepper
Optional: chopped spring onions or shredded cheese for garnish
Directions
Heat it up – In a saucepan, melt butter over medium heat.
Add the corn – Stir in the Pictsweet Golden Sweet Cream Corn.
Make it creamy – Pour in milk or cream and stir until warm and smooth.
Season – Add salt and pepper to taste.
Serve – Garnish with spring onions or cheese and enjoy as a side dish with grilled meats or rice.

Dinner, Break Fast, Snacks
Quick & Easy Mini Cheese Pizza Bites with Armour Cheese Pizza Lunch Maker
✅ Quick & Convenient – Ready in minutes, perfect for busy families and kids’ snacks.
✅ Kid-Friendly – Fun, customizable, and tasty—children love making their own mini pizzas!
✅ Budget-Friendly – Affordable way to enjoy cheesy pizza flavor without takeout.
✅ Portable Snack – Great for lunchboxes, after-school snacks, or on-the-go meals.
Ingredients
1 pack Armour Cheese Pizza Lunch Maker (2.44 oz)
2–3 fresh cherry tomatoes (optional, for topping)
A sprinkle of dried oregano or Italian seasoning (optional)
Olive oil spray or butter (optional, for extra crispiness)
Directions
Prepare the base – Open the Armour Cheese Pizza Lunch Maker pack. Lay out the mini crusts provided inside.
Add the sauce – Spread the pizza sauce evenly over each crust.
Top with cheese – Sprinkle the shredded cheese generously on top.
Customize it – Add sliced cherry tomatoes or your favorite toppings for extra flavor.
Warm it up – Place the pizzas in a microwave for 30–45 seconds (until cheese melts) or toast them in an oven/air fryer for 3–5 minutes for a crispy finish.
Serve & enjoy – Your quick mini cheese pizzas are ready to serve!
Dinner, Lunch, Snacks
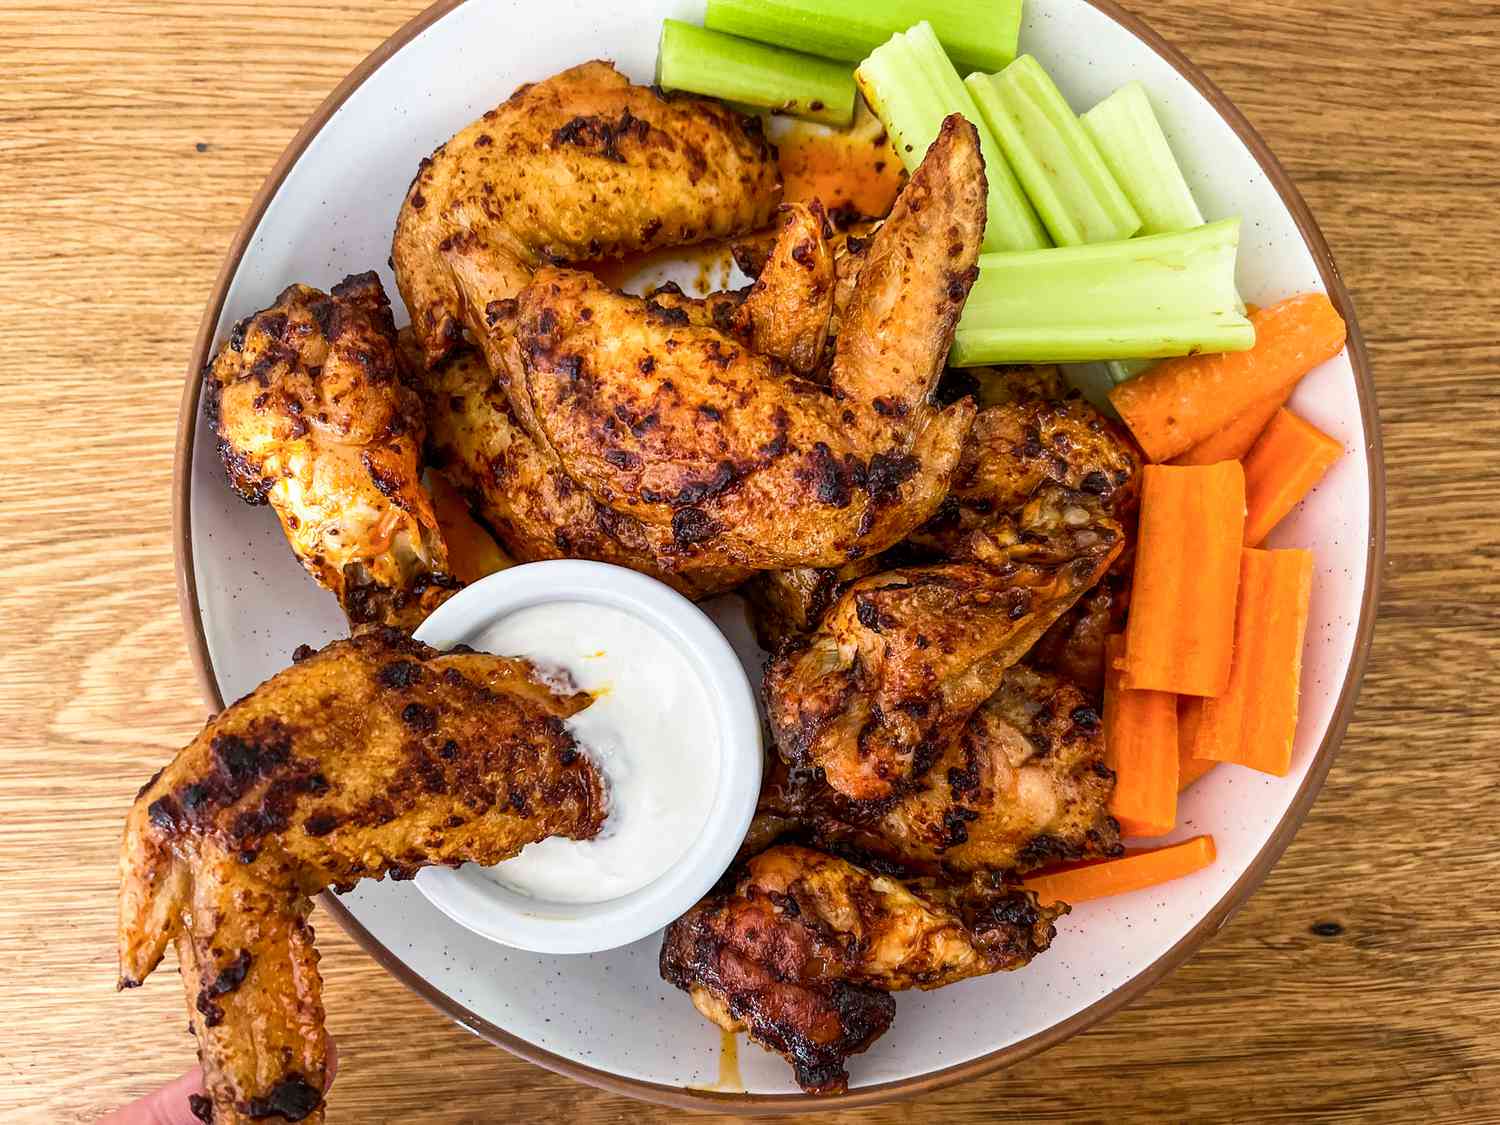
🔥 Crispy Baked Chicken Wings
Protein-Packed – Chicken wings are a great source of lean protein.
✅ Versatile Flavour – Season them your way—spicy, sweet, smoky, or tangy.
✅ Budget-Friendly Meal – Affordable, shareable, and perfect for family gatherings or game nights.
✅ Healthier Option – Baking instead of frying keeps them crispy but with less oil.
Ingredients
2 lbs fresh Chicken Wings (from Dollar Saver Market)
2 tbsp olive oil
1 tsp garlic powder
1 tsp onion powder
1 tsp paprika
½ tsp black pepper
1 tsp salt
Optional: Hot sauce or BBQ sauce for tossing
Directions
Prep the wings – Rinse and pat the chicken wings dry with a paper towel. This helps them crisp up in the oven.
Season – In a large bowl, toss wings with olive oil, garlic powder, onion powder, paprika, salt, and black pepper until evenly coated.
Bake – Arrange wings on a baking rack over a lined tray. Bake at 400°F (200°C) for 40–45 minutes, flipping halfway through.
Optional glaze – For extra flavor, toss the baked wings in hot sauce or BBQ sauce and return to the oven for 5 minutes.
Serve hot – Enjoy with ranch or blue cheese dip and celery sticks.
Dinner, Lunch
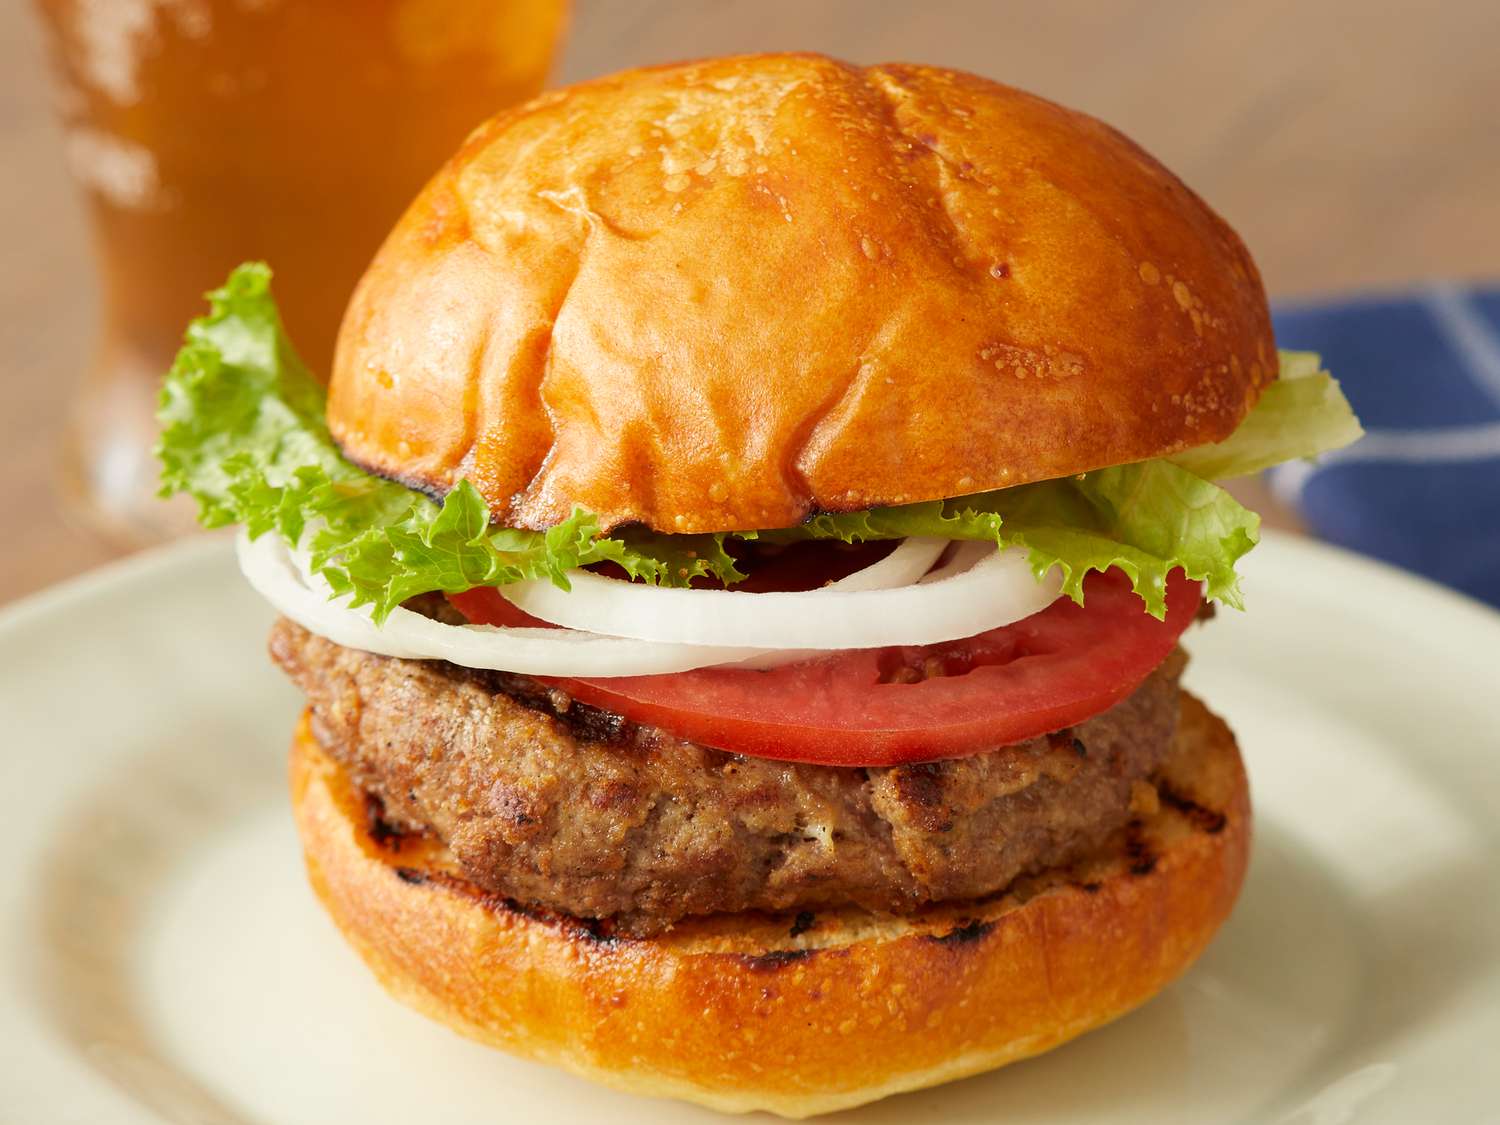
The Best Basic Burger
Classic never goes out of style. This juicy, no-frills burger gets a major flavor boost from the zesty Always Save Seasoned Salt, tangy Always Save Ketchup, and bold Always Save Mustard—because sometimes simple is seriously delicious. Fire up the grill and let the magic happen with our Best Basic Burger recipe!
Ingredients
1 1/2 lbs of 80/20 ground beef
1 tbsp Worcestershire sauce
1 1/2 tsp Always Save Seasoned Salt
1 tsp Always Save Garlic Powder
1/2 tsp Always Save Black Pepper
4 Always Save Sandwich Slices
4 hamburger buns
Lettuce
Tomatoes, sliced
Always Save Sweet Pickle Chips
Always Save Ketchup
Always Save Mustard
Directions
Heat the grill to medium-high heat.
In a large bowl, add the ground beef, Worcestershire sauce, seasoning salt, garlic powder, and black pepper.
Use your hands to mix the ingredients until they are just combined.
Divide the meat mixture into fourths.
Take 1/4 of the meat mixture and press it into the shape of a hamburger patty that is about 3/4 inch thick.
Make an indention in the middle of the patty to prevent bulging in the center of the hamburger as it cooks.
Repeat with the remaining meat mixture, making 4 hamburgers.
Place the burgers on the grill and cook for 4-5 minutes on the first side.
Flip the burgers over and cook an additional 4-5 minutes, until 160°F.
Lay a slice of cheese on each burger patty about 1 minute before taking the burgers off the grill, so the cheese has a chance to melt.
Serve the burgers on hamburger buns with the toppings.

Dinner, Lunch, Snacks
Pizza Party Sliders
Celebrate your graduate’s big day with these irresistible Pizza Party Sliders! Packed with melted Always Save Mozzarella Cheese, savory Always Save Tomato Paste, and a sprinkle of Always Save Grated Parmesan, these mini sandwiches are a hit at any gathering. Each slider is bursting with all the delicious pizza flavors but in a perfectly bite-sized package that’s easy to serve and even easier to enjoy. Whether you’re serving them as appetizers or adding them to your party spread, these pizza sliders are sure to be a crowd favorite!
Ingredients
2 bags Always Save Shredded Low-Moisture Part-Skim Mozzarella Cheese
1 tbsp basil
1/4 tsp Always Save Black Pepper
4 tsp dried Italian seasoning, divided
1 can Always Save Tomato Paste
3 oz water
1 (24 count) package Hawaiian sweet rolls
1/2 lb thinly sliced deli pepperoni
4 tbsp Always Save Salted Butter
2 tbsp Always Save Grated Parmesan Cheese
3/4 tsp Always Save Garlic Powder
Directions
Preheat the oven to 375°F.
Line a rimmed baking sheet with parchment and place a cooling rack on baking sheet.
Spray the rack with cooking spray.
Stir together the mozzarella, basil, black pepper, and 3 tsp of the Italian seasoning in a small bowl until combined. Set aside for later.
Stir together the tomato paste and water in another small bowl and set aside.
Without separating the individual rolls, cut the entire slab of rolls in half horizontally using a serrated knife.
Place bottom layer of rolls on the prepared baking sheet and set top layer of rolls aside.
Sprinkle the bottom layer of rolls evenly with half of the cheese mixture.
Top evenly with half of pepperoni and half of the sauce.
Repeat these layers once.
Bake the bottom layer of rolls and layers until the cheese melts, about 15 minutes.
Meanwhile, combine the butter, Parmesan cheese, garlic powder, and remaining 1 tsp of Italian seasoning in a small saucepan.
Cook over medium heat, stirring occasionally, until butter melts, 1 to 2 minutes and set aside.
Remove rolls from oven and add top layer of rolls to the bottom layers of rolls.
Brush the tops of rolls evenly with butter mixture.
Return the sliders to the oven, and bake until rolls are golden brown and crisp, about 5 minutes.
Separate the rolls with a sharp knife and serve immediately.